Creating an RSS Feed to Add Your Jekyll / Github Pages Blog to R-Bloggers
In this post, we will go through the steps you need to follow if you would like to add a Jekyll / Github Pages blog to R-Bloggers. I recently went through this process and had to search through a lot of information in order to figure out how to do it. The process was particularly tricky because not all of the posts on my blog are about R (and therefore not all are relevant for R-Bloggers). Below, we will go through the process that will allow you to submit only blog posts about R to R-Bloggers. Hopefully this blog post will make the process simpler for others!
In what follows, we will assume that you have a working Jekyll site that you build locally and which you host publically at Github or somewhere else, and that you understand the basic layout of the folders in the Jekyll site directory.
Step 1: Add Jekyll Feed to Your Site
R-Bloggers needs an RSS feed in order to show your blog posts on their site. You can add a Jekyll module, called Jekyll Feed in order to generate this RSS feed.
Simply follow these three steps to install Jekyll Feed (the first two are copied directly from the Jekyll Feed link above):
- Add this line to your site’s Gemfile:
gem 'jekyll-feed'- And then add this line to your site’s _config.yml:
plugins:
- jekyll-feed- Open the Ruby prompt on your computer, navigate to your site’s root directory, and run:
bundle installThis will make sure you have the jekyll-feed plugin installed (if it isn’t already).
Step 2: Create An XML File to Generate the RSS Feed
As explained in this excellent blog post by Yongfu Liao, Jekyll Feed doesn’t allow you to generate an RSS feed for a particular tag or category of posts. However, there is a workaround which you can read more about here and here.
Yongfu shares his modification of the original workaround on Github. This code is really nice because it provides exactly the format of the RSS feed required by R-Bloggers.
All you need to do is to take the code below, paste it into a text editor, and save it as an .xml file. For example, my file is called “feed.r.bloggers.xml.”
Make sure you change the “Author” section in the code to your email address (the name part is optional). Indicate the tag you will use to indicate that a given post is suitable for R-Bloggers. In the example below, I specify: [“R”], meaning all posts with this (case-sensitive) tag will be included in the RSS feed.
All credit for this code goes to Yongfu Liao - thank you for sharing this solution on your blog!
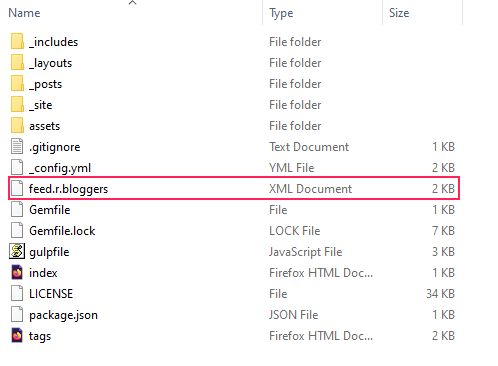
Step 3: Place the .xml File In Your Site’s Root Directory
Place the .xml file in the root directory of your Jekyll site. Here is a screenshot example for my blog:
Step 4: Rebuild Your Site and Find the RSS Feed
Once you put the .xml file in the root directory of your site, your blog should re-build itself automatically, generating the RSS feed we specified in the .xml file.
You can find the rss feed file in your site’s _site directory. The file we’ve generated here is called “feed.r.bloggers.xml.”
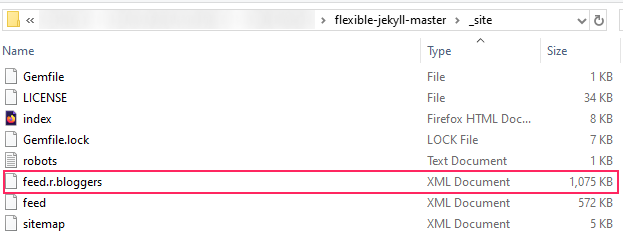
Notice that there is also a file called “feed.xml.” This is the rss feed for all the posts on the blog, generated by default from the jekyll-feed plugin we installed earlier.
You can find the R-Bloggers feed in the local version of your site at this location: http://localhost:4000/feed.r.bloggers.xml
Step 5: Push to Github and Test Your RSS Feed
Once you’ve got the rss feed working correctly on the local version of your site, it’s time to push it to Github (or wherever you host your site).
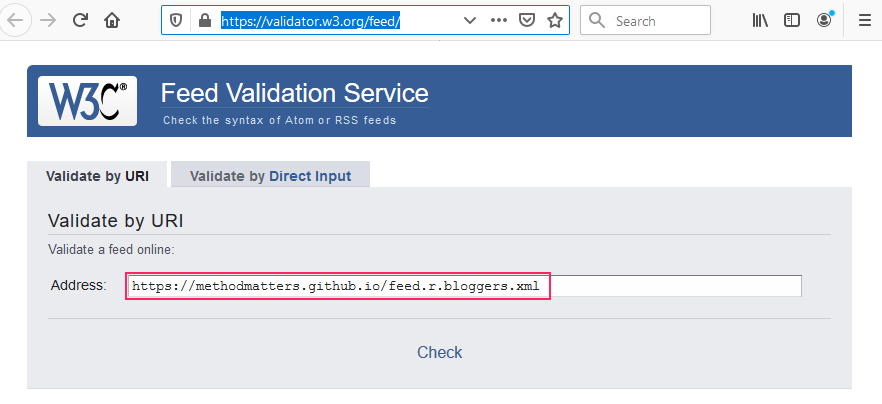
When you’ve done this, you’ll find the R-Bloggers rss feed at your website address + ‘/feed.r.bloggers.xml’. For example, the R-Bloggers rss feed for this blog can be found at this address: https://methodmatters.github.io/feed.r.bloggers.xml.
Step 6: Validate Your RSS Feed and Submit to R-Bloggers
Before submitting to R-Bloggers, you need to check that your RSS feed is valid. Tal Galili (who runs R-Bloggers) recommends testing your feed via this validator: https://validator.w3.org/feed/
Simply paste the link to the feed on your site into the box and click on “Check.”
If your feed passes the inspection, you’re ready to submit your blog to R-Bloggers, which you can do here! Make sure to follow all of the guidelines Tal lays out in order to be accepted!
Summary and Conclusion
In this post, we saw how to configure a Jekyll / Github Pages website to create an RSS feed to allow us to submit blog posts about R to R-Bloggers. The process is not very straightforward, but I personally feel that the hassle is worth it in order to take advantage of all the really nice features of Jekyll (great flexibility, beautiful templates) combined with free hosting on Github Pages. I made the switch to Jekyll / Github Pages this past summer from Blogger, and am super happy about the way the blog looks, and the freedom I have to blog about R, Python, or anything else.
Coming Up Next
In the next post, we will return analyzing data, specifically, detailed records of my phone usage. We will use data munging and visualization to see how and when my phone usage patterns differ throughout the day.
Stay tuned!